Building a Home Video Studio on a Budget
Set up a professional-looking home video studio without overspending. Prioritize audio, lighting, background, and camera upgrades in the right order.
You don’t need a professional studio to create professional-looking videos. Many successful creators film in a corner of a bedroom or home office. What separates polished videos from amateur ones is usually not the camera, but sound, light, and background.
This guide explains what to upgrade first and how to build a home studio in stages without overspending.
Key takeaways
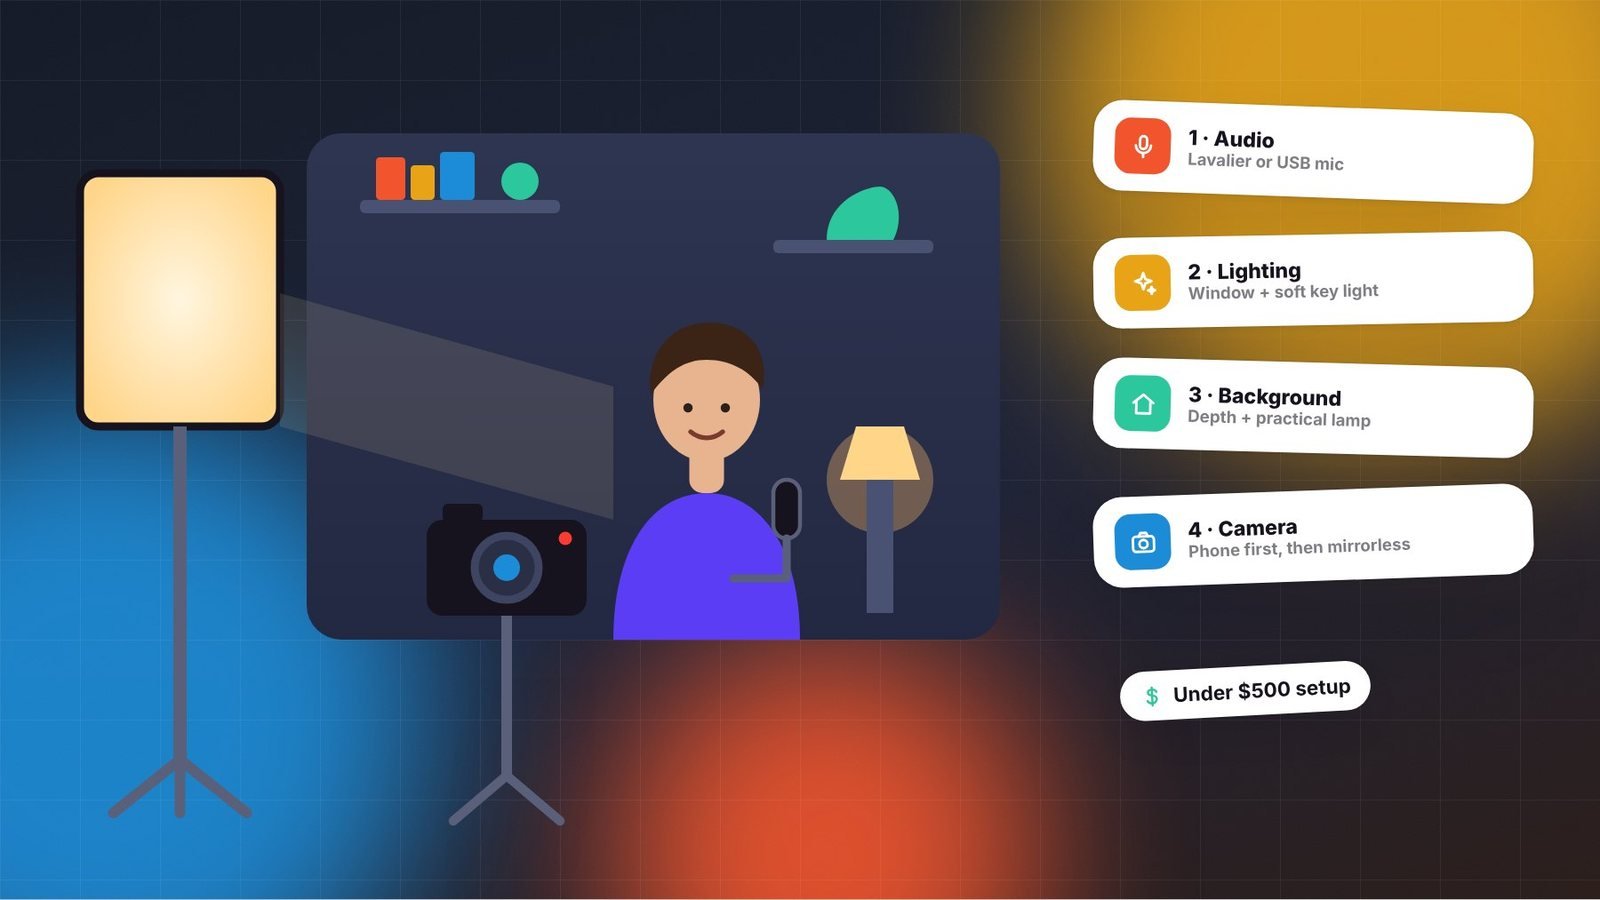
- Upgrade in this order: audio, lighting, background, then camera.
- Use soft, large light sources and control window light.
- Treat your room for echo before buying expensive microphones.
Priority 1: Audio
Viewers forgive slightly soft video, but they quickly leave videos with echoey, muffled, or noisy audio. Upgrading your microphone is the single biggest improvement for most creators.
- Lavalier (clip-on) mics are affordable and keep the mic close to your mouth. Wireless versions are convenient for moving around.
- USB microphones are great for desk setups, podcasts, and voiceovers.
- Shotgun mics mount on a camera or boom arm, just out of frame, for a clean look.
- XLR mics with an audio interface offer more flexibility as you grow.
Reduce echo first
Hard, empty rooms create echo. Soft surfaces absorb sound. Add rugs, curtains, bookshelves, a couch, or blankets out of frame. Acoustic panels help but aren’t essential. Even recording in a closet full of clothes can produce surprisingly clean voiceovers.
Priority 2: Lighting
Good lighting makes any camera look better. The goal is soft, even light on your face.
Start with a window
Face a window, or place it slightly to the side, for free, flattering light. Avoid having a bright window behind you, which turns you into a silhouette. Sheer curtains diffuse harsh direct sun.
Add a key light
A softbox or LED panel with a diffuser becomes your main light. Place it at about a 45-degree angle from your face, slightly above eye level. The larger and closer the light source, the softer the shadows.
Add fill and background light later
- Fill light: a dimmer light or reflector on the opposite side softens shadows.
- Background light: a small LED lamp or practical light behind you adds depth and separation.
Keep all lights at the same color temperature to avoid mismatched tones, and turn off overhead room lights, which often create unflattering shadows.
Priority 3: Background
Your background communicates your brand. It doesn’t need to be fancy, but it should be intentional:
- Add depth by sitting a few feet away from the wall.
- Include a few relevant objects: books, plants, products, or art tied to your niche.
- Remove clutter and anything distracting or personal.
- Use practical lights such as a lamp or LED strip for warmth and visual interest.
Priority 4: Camera
Your smartphone’s rear camera is likely excellent. Use it with a tripod and a phone mount, record at a consistent resolution and frame rate, and lock exposure and focus if your camera app allows.
When you’re ready to upgrade, a mirrorless camera with a fast lens gives you a blurred background and better low-light performance. Look for clean HDMI output, a flip screen, good autofocus, and a way to run on continuous power for long recordings.
Sample setups by budget
| Budget level | What to buy |
|---|---|
| Under $150 | Lavalier or USB mic, phone tripod, window light, simple background cleanup |
| $150–$500 | Add a softbox or LED key light, a reflector, sound-absorbing rug or curtains |
| $500–$1,500 | Add a quality shotgun or XLR mic, fill and background lights, a used mirrorless camera |
| $1,500+ | Fast lenses, teleprompter, acoustic treatment, dedicated recording space |
Prices are rough ranges and vary widely. Buying lightly used gear from reputable sellers can stretch your budget significantly.
Small details that make a big difference
- Frame at eye level with your eyes about one-third from the top of the frame.
- Clean your lens before every shoot.
- Do a test recording and listen with headphones.
- Mark positions for lights, tripod, and chair with tape so setup is fast. This pairs perfectly with our content batching system.
Gear and taxes
Equipment used for your creator business is generally a deductible business expense. Keep receipts and track purchases. Our guide to taxes for content creators explains the basics.
Start with what you have, upgrade one piece at a time, and let your content quality and income justify each next step.
Frequently asked questions
Do I need an expensive camera to start?
No. A modern smartphone with good lighting and audio can produce excellent video. Upgrade your camera after you’ve improved sound, lighting, and background.
What is the best lighting setup for a small room?
Start with a window in front of you, then add one soft key light at about a 45-degree angle. A small background light adds depth. Turn off harsh overhead lights.
How do I reduce echo without acoustic panels?
Add soft materials such as rugs, curtains, blankets, bookshelves, and upholstered furniture. Filling bare walls and floors with soft surfaces significantly reduces echo.